摘要:本文介绍了Hexo博客框架的安装和使用方法,包括环境配置和初始化博客并新建文章,以及分类和标签的设置。
环境
Windows 10 企业版 LTSC 21H2
Node 18.14.0
NPM 9.3.1
Git 2.37.3
Hexo 4.3.1
1 简介
Hexo是一个快速、简洁且高效的博客框架。Hexo使用Markdown(或其他标记语言)解析文章,在几秒内,即可利用靓丽的主题生成静态网页。
2 环境
2.1 安装Git
由于初始化博客目录需要Git支持,并且Hexo的某些命令需要在bash命令行中执行,因此需要安装Git工具。
下载方式:
- 方式一,官网下载最新版:https://git-scm.com
- 方式二,通过GitHub选择2.37.3版本下载,历史版本下载地址:v2.37.3.windows.1/
- 方式三,通过淘宝镜像下载,比GitHub访问速度快:v2.37.3.windows.1/
如果不太了解Git工具,可以使用默认设置安装。
安装结束后,右键选择Git Bash Here进入bash命令行。
输入git --version命令查看Git的安装版本:
1 | momashanhe@localhost momashanhe $ git --version |
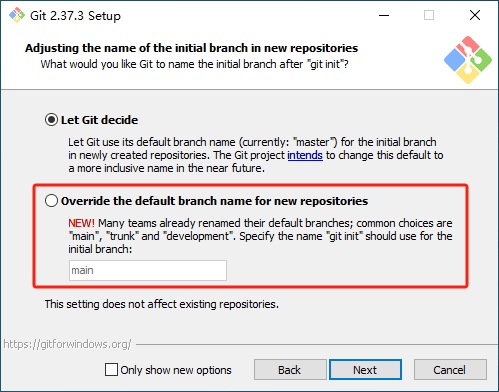
需要注意的是,默认安装的2.37.3版本在初始化本地Git项目的时候,默认创建的分支还是master分支,可以在安装的时候自定义:
2.2 安装Node
Hexo基于Node,搭建过程中还需要使用NPM(Node包管理工具,安装Node时默认安装)。
下载方式:
- 方式一,官网下载最新版:https://nodejs.org/en
- 方式二,本文使用的是18.14.0版本,下载地址:v18.14.0/
使用默认配置安装即可。
在bash命令行输入node -v命令查看Node版本:
1 | momashanhe@localhost momashanhe $ node -v |
在bash命令行输入npm -v命令查看NPM版本:
1 | momashanhe@localhost momashanhe $ npm -v |
NPM是包管理工具,通过命令将安装包使用的源设置为淘宝镜像,速度会快一些:
1 | npm config set registry https://registry.npmmirror.com |
使用命令查看安装使用的源:
1 | npm config get registry |
2.3 安装Hexo
在bash命令行中使用NPM安装Hexo:
1 | npm install hexo-cli -g |
安装结束后,使用hexo -v命令查看Hexo版本:
1 | momashanhe@localhost momashanhe $ hexo -v |
3 使用
3.1 初始化博客目录
在电脑中新建博客目录,右键进入bash命令行,使用hexo init命令初始化博客目录:
1 | momashanhe@localhost momashanhe $ hexo init |
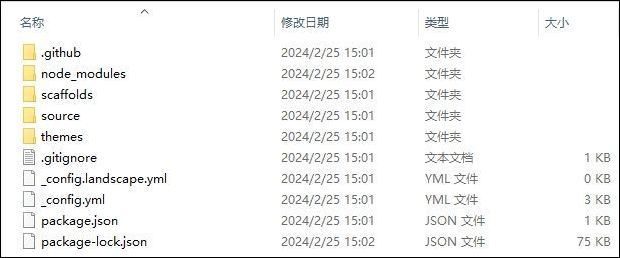
目录结构如下:
3.2 博客预览
使用hexo generate命令生成博客内容,也可以简写为hexo g命令:
1 | momashanhe@localhost momashanhe $ hexo generate |
使用hexo server命令启动本地预览,也可以简写为hexo s命令:
1 | momashanhe@localhost momashanhe $ hexo server |
根据提示,在浏览器输入地址访问博客:http://localhost:4000/
可以看到博客的默认界面:
可以同时按下Ctrl+C停止博客。
3.3 新建文章
使用hexo new test命令创建标题为test的文章。
执行后在博客目录/source/_posts目录中会自动新增对应的Markdown文件。
也可以指定标题和目录:
1 | hexo new post test -p demo/test |
可以通过文本编辑器修改文章,保存后在本地预览:
1 | hexo clean && hexo server |
3.4 站点设置
修改博客目录下的_config.yml配置文件,修改的Site配置项。
4 内容优化
4.1 分类
进入博客目录,打开bash命令行,添加分类页:
1 | hexo new page categories |
打开sources/categories/index.md文件,增加分类配置:
1 | --- |
使用分类:
1 | --- |
4.2 标签
进入博客目录,打开bash命令行,添加标签页:
1 | hexo new page tags |
打开sources/tags/index.md文件,增加标签配置:
1 | --- |
使用标签:
1 | --- |
4.3 引用
使用引用:
1 | --- |

条